Log every Apple Pay purchase automatically: a Shortcuts automation that sends each tap to Fetch, no bank login
October 16, 2026 · Fetch Team · iPhone only (iOS 26 or iOS 27) · The steps and screenshots are the in-app guide's own
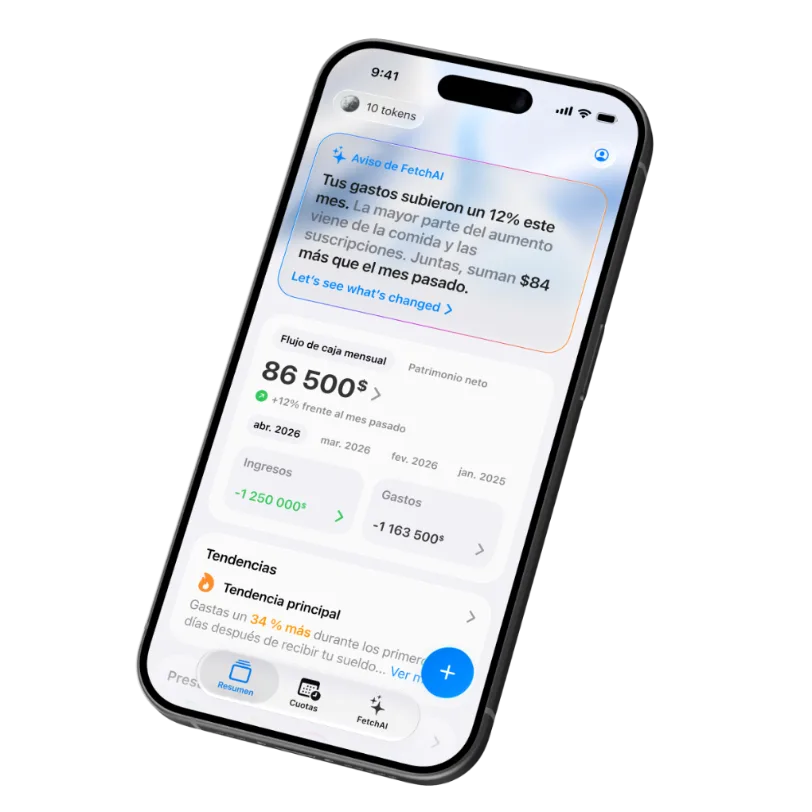
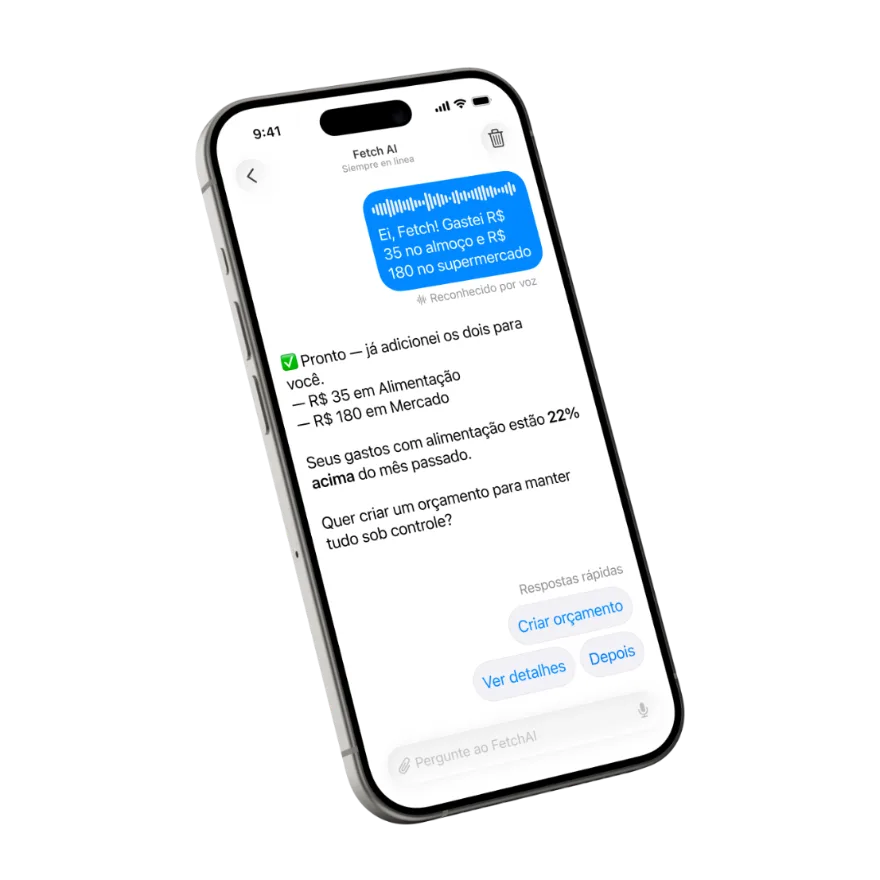
You pay with Apple Pay, the terminal beeps, and the purchase is already in Fetch: amount, store and date, categorized. Nothing typed and no bank login: Fetch never touches Wallet or your account. The work is done by a Shortcuts automation, Apple's own app, which you set up once. This page is that setup, step by step, with the same screenshots the in-app guide shows, plus what's worth knowing first: what data arrives, what it doesn't do, and how to check it works.
What you need
- An iPhone on iOS 26 or iOS 27. The guide covers both because Shortcuts changed between them: on iOS 26 you build the automation by hand; on iOS 27 it arrives ready from a link.
- The latest version of Fetch, signed in. Open it at least once after installing or updating, so iOS knows the “Log expense” action.
- Your cards in Wallet. You choose which ones trigger the log; you can tick all of them.
Android? Apple Pay and Shortcuts don't exist there. On Android, Fetch logs the expense by voice, from a receipt photo or from an uploaded statement.
How it works (and what it doesn't do)
The chain is short: you pay with a Wallet card → iOS fires the automation → the automation runs Fetch's “Log expense” action → Fetch saves the transaction with the source Apple Pay. Fetch assigns the category from the merchant name, and you can change it afterwards. iOS runs all of this even when Fetch is closed.
What it doesn't do, plainly:
- It doesn't read Wallet or your bank. Fetch receives only what the automation hands over: amount, merchant and date. The action has no field for the card number, so it never travels.
- It doesn't know your balance or your statement. Only the payments that pass through the trigger.
- It's built for paying at the terminal. Apple describes the trigger as “when I tap”: an automation for whenever the chosen card is tapped. If a purchase in an app or on the web doesn't fire it, log it by voice or from your statement.
- Every payment is one expense. Two identical coffees on the same day stay two transactions; they are not merged. Refunds don't log themselves.
iOS 27: two steps
On iOS 27 the automation lives inside the shortcut, and a shortcut can be shared together with its trigger. So Fetch hands it over ready: the Wallet trigger and “Log expense” with the amount and merchant already wired. The one thing that doesn't travel with a shared shortcut is your consent: it arrives with the automation off, and you turn it on.
Get the “Fetch Apple Pay” shortcut (opens in Shortcuts). The same link is inside the app, in the Apple Pay guide.
-
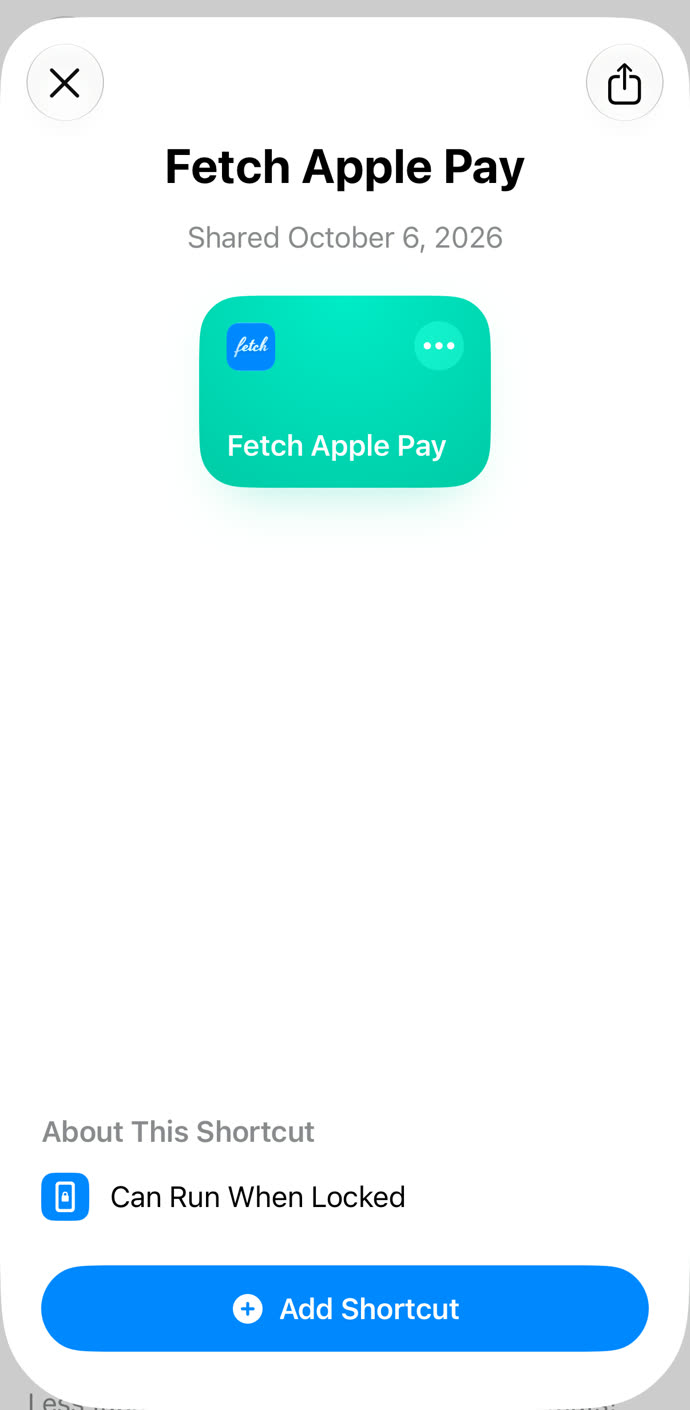
Step 1. Tap Get the shortcut, then Add Shortcut. Fetch Apple Pay arrives ready: the Wallet trigger and Log expense with the amount and merchant already filled in. -
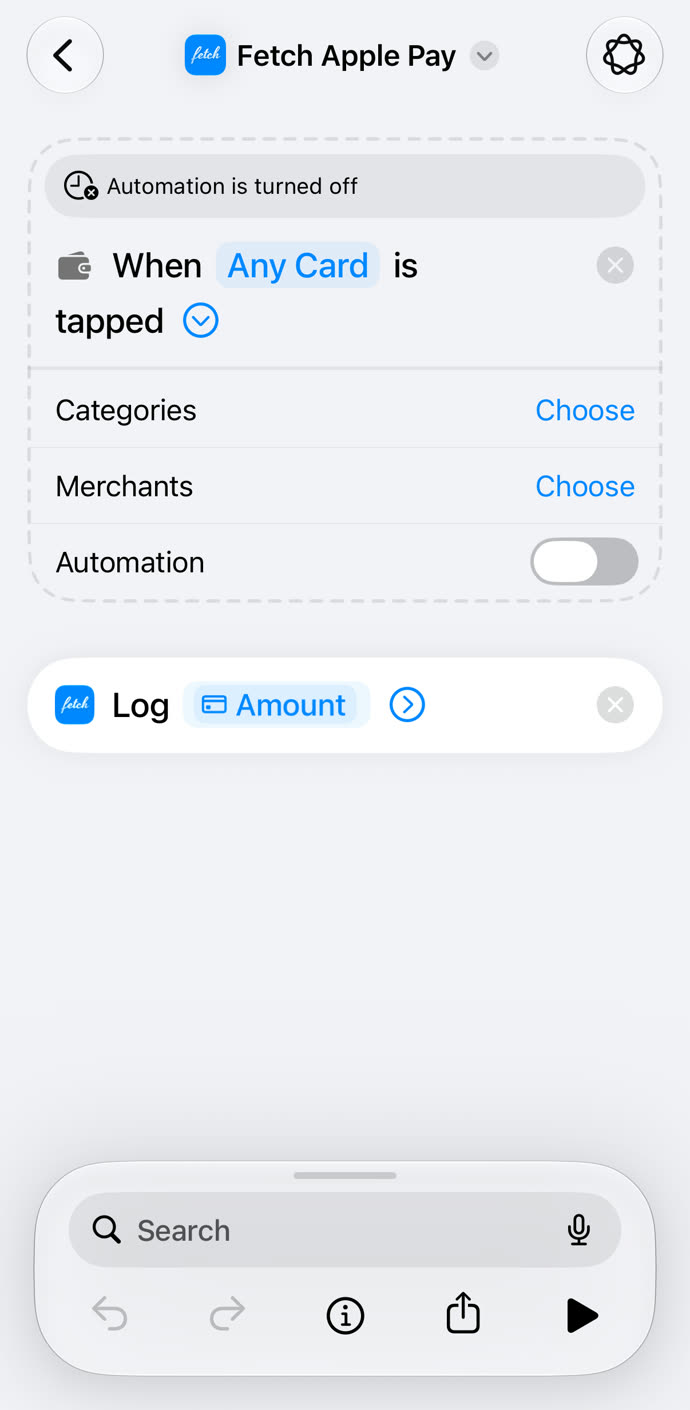
Step 2. Open Fetch Apple Pay, tap the arrow next to the trigger and turn on Automation — shortcuts from a link arrive with it off.
iOS 26: twelve steps, one per screen
On iOS 26 Apple doesn't let anyone share a personal automation, so you build it by hand. Twelve taps; each has its screen below. Names are those of Shortcuts in English.
-
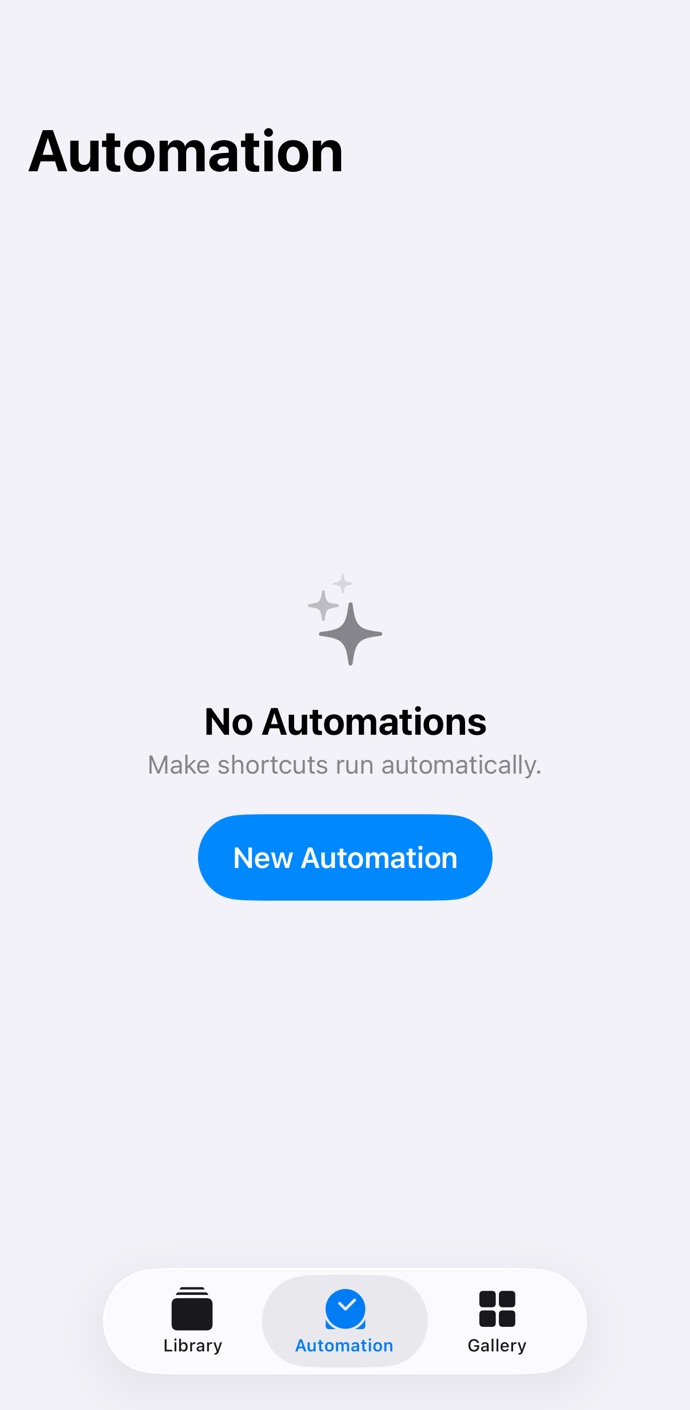
Step 1. Open Shortcuts, go to the Automation tab and tap New Automation. -
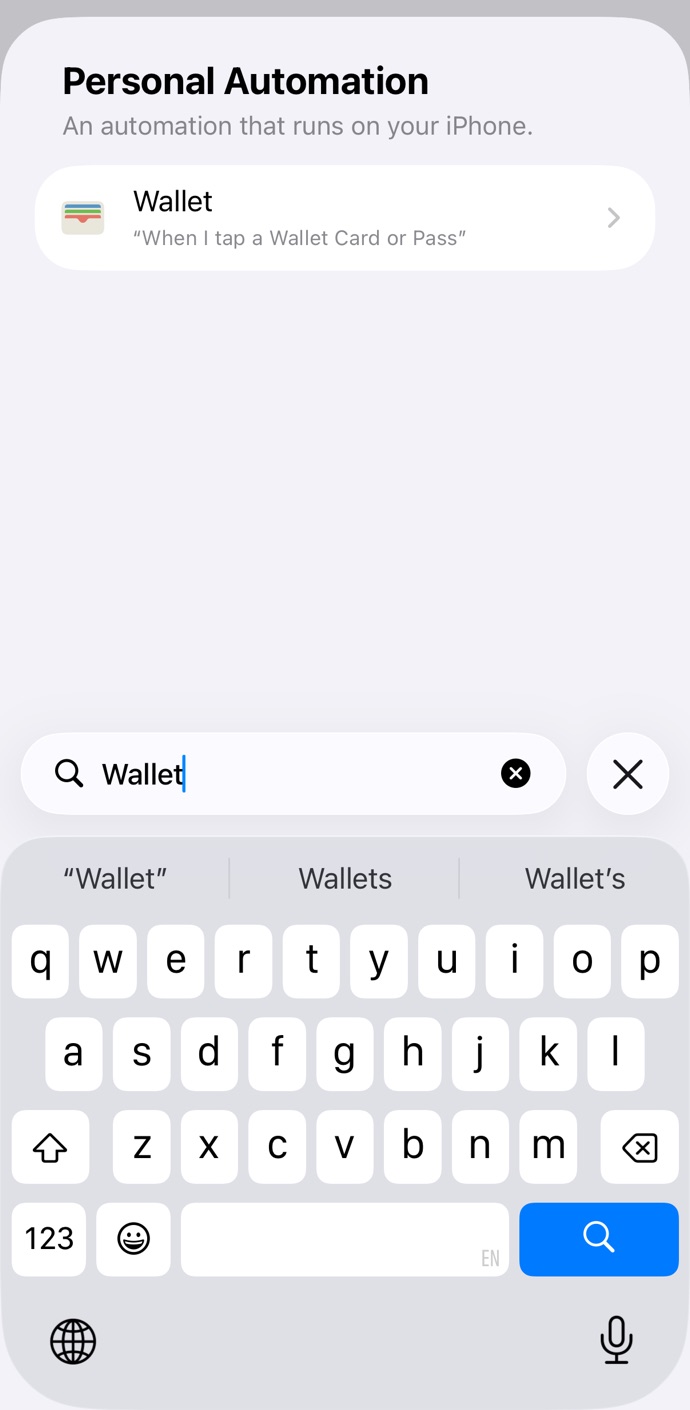
Step 2. Type Wallet in the search and pick “When I tap a Wallet Card or Pass”. -
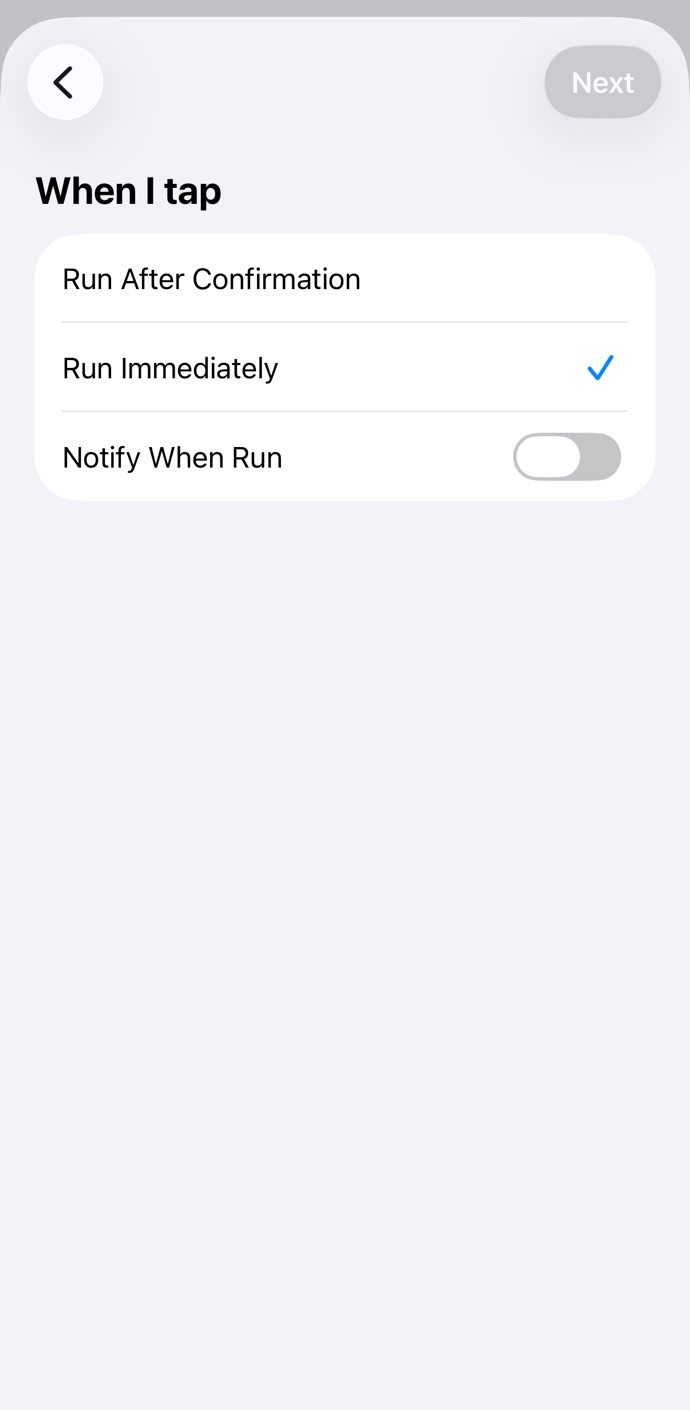
Step 3. Tick the cards you pay with and choose Run Immediately, so nothing asks for confirmation at the till. Then tap Next. -
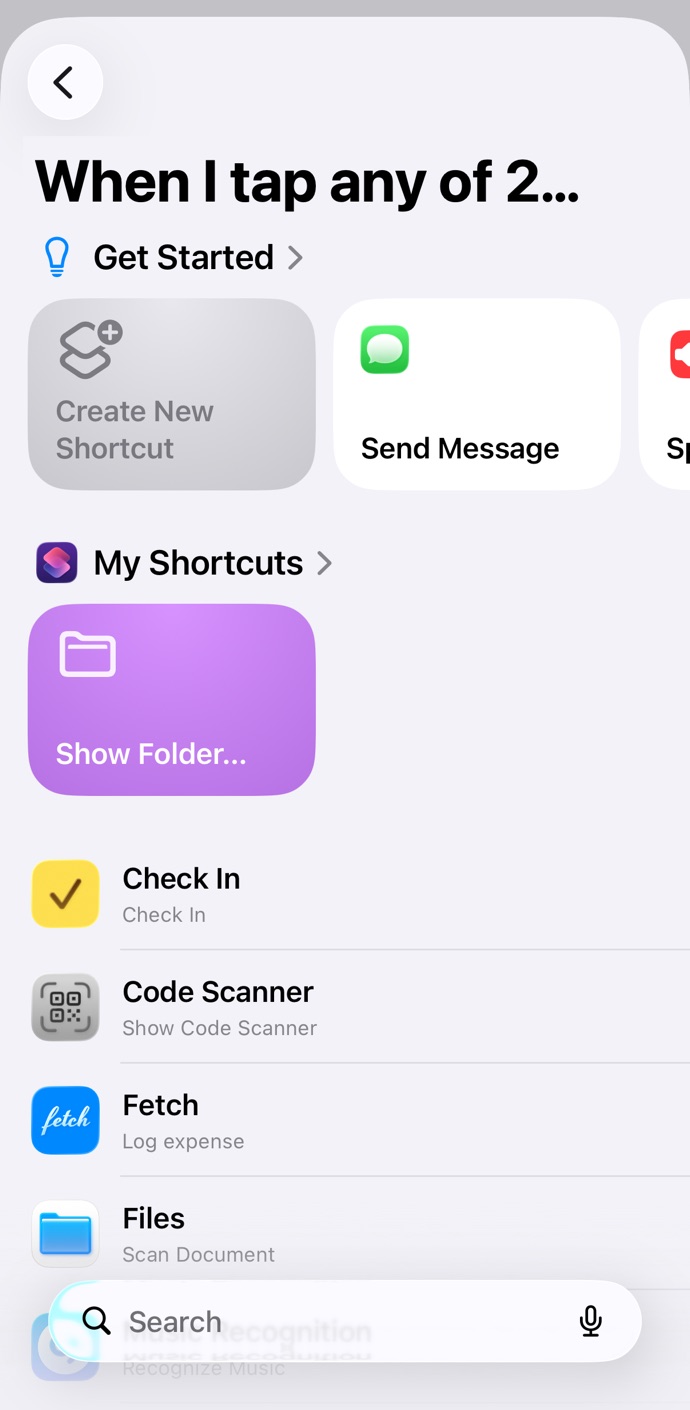
Step 4. Tap Create New Shortcut — the first tile under Get Started. It opens an empty shortcut for this automation. -
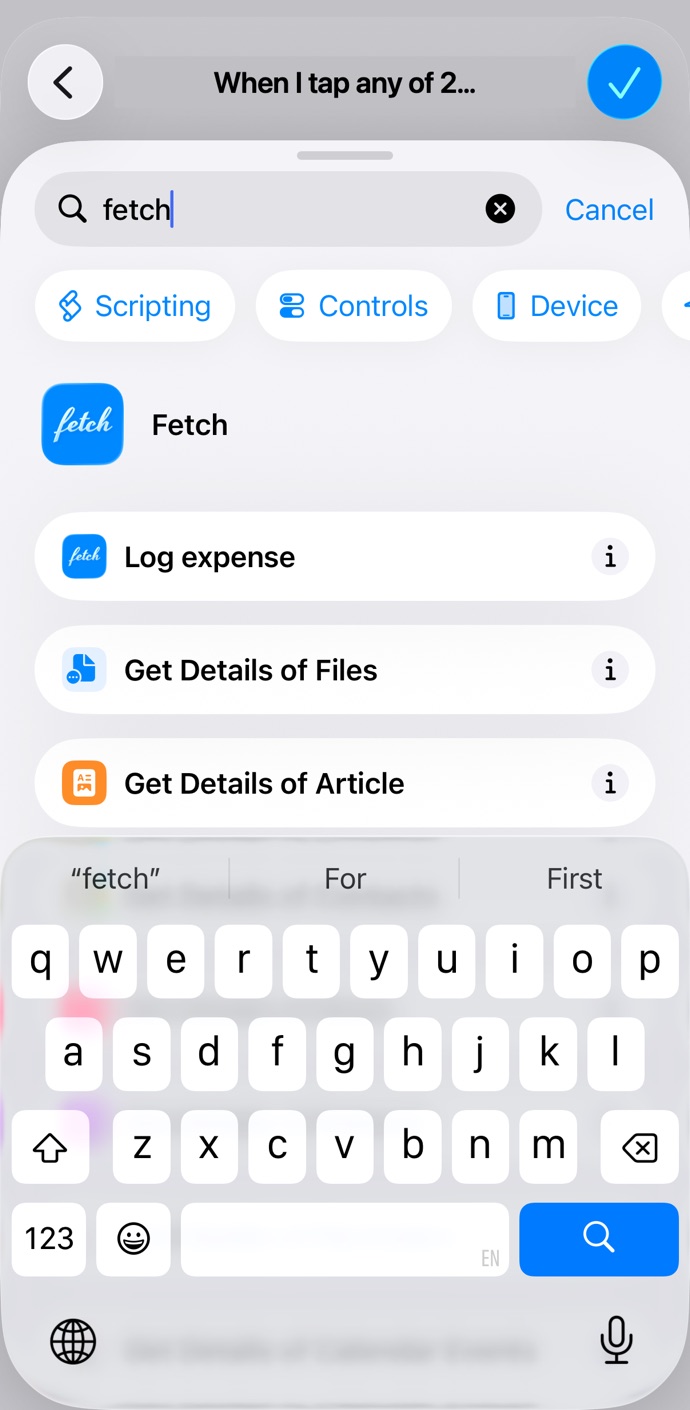
Step 5. Search for fetch and tap Log expense to add it. -
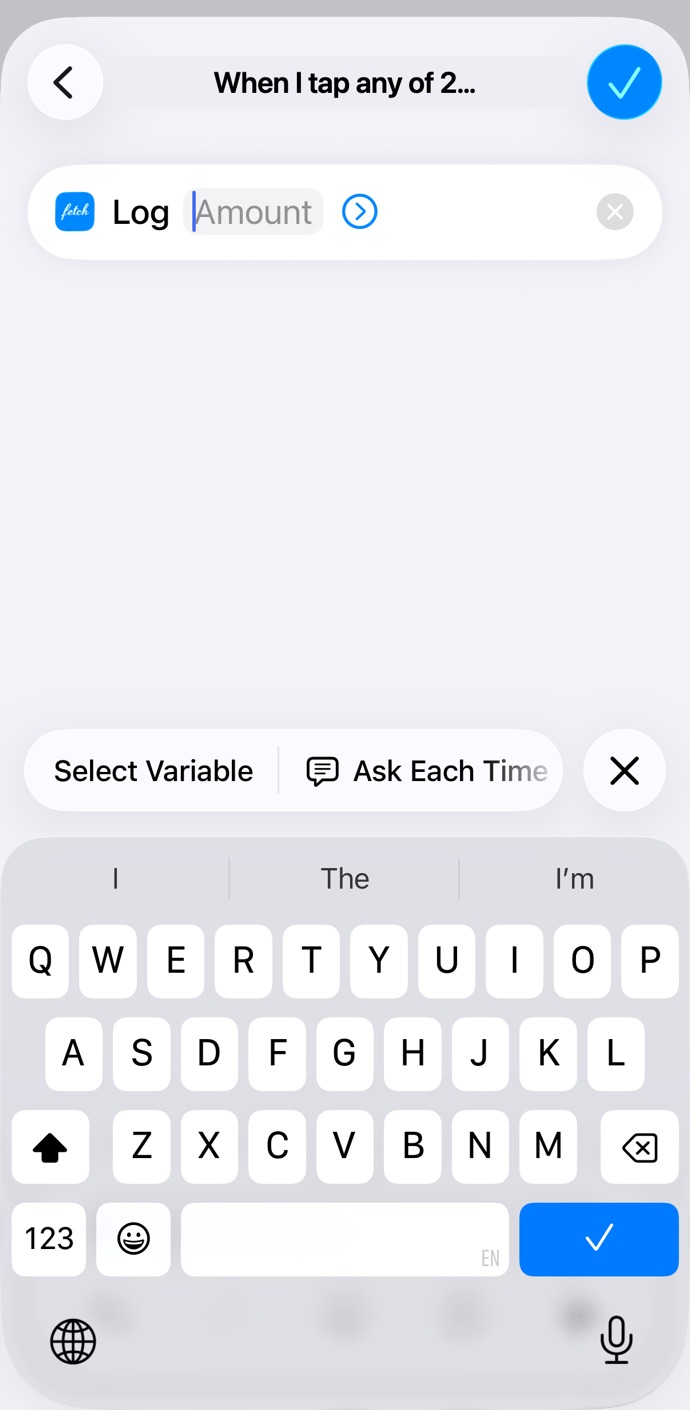
Step 6. Tap the Amount field — a keyboard appears. Tap Select Variable above it; don’t type a number. -
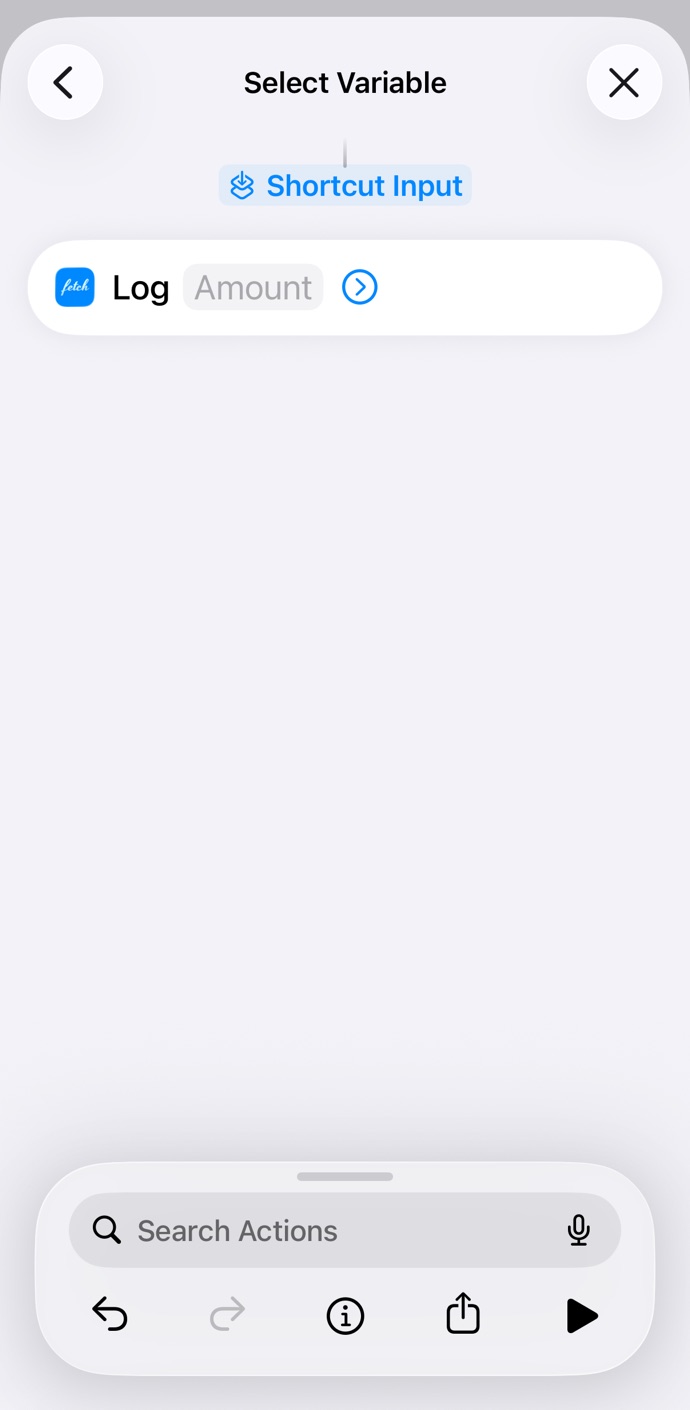
Step 7. Tap Shortcut Input, which appears above the action. It stands for the card payment. -
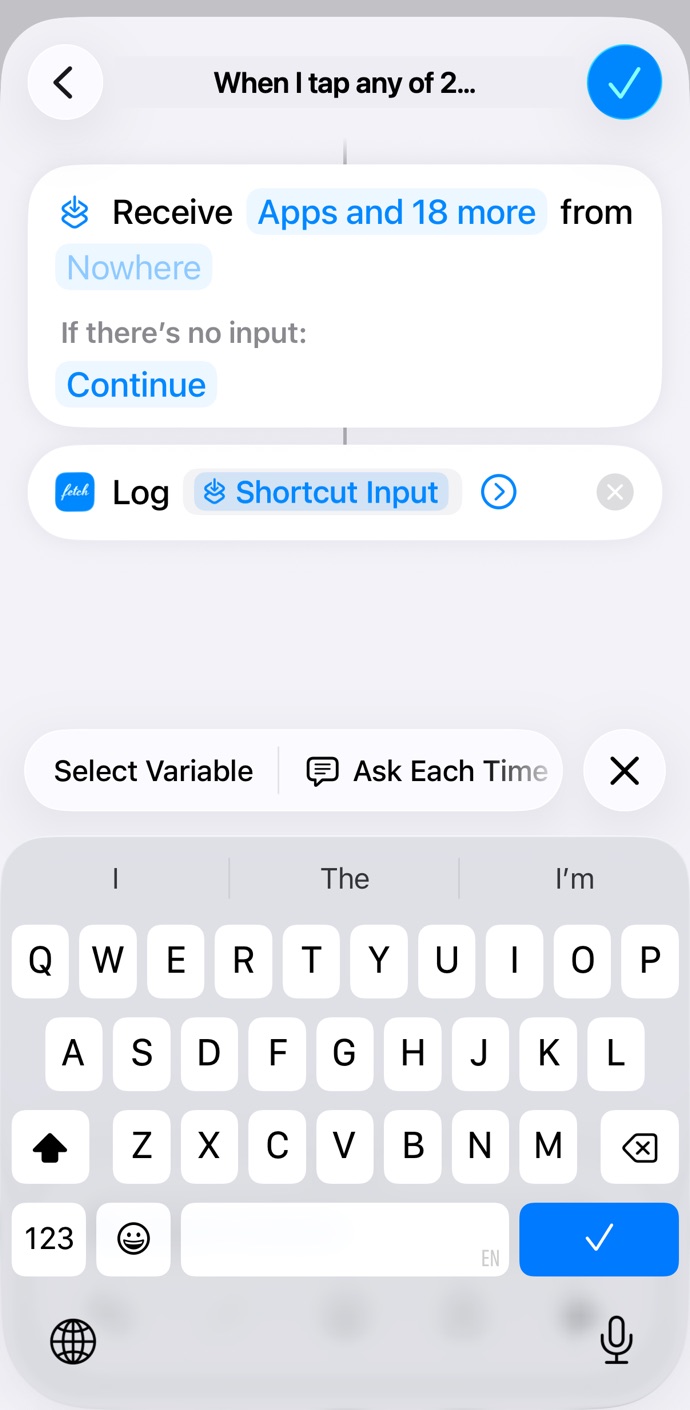
Step 8. Tap the Shortcut Input token now in the field and choose Amount from the list that opens. -
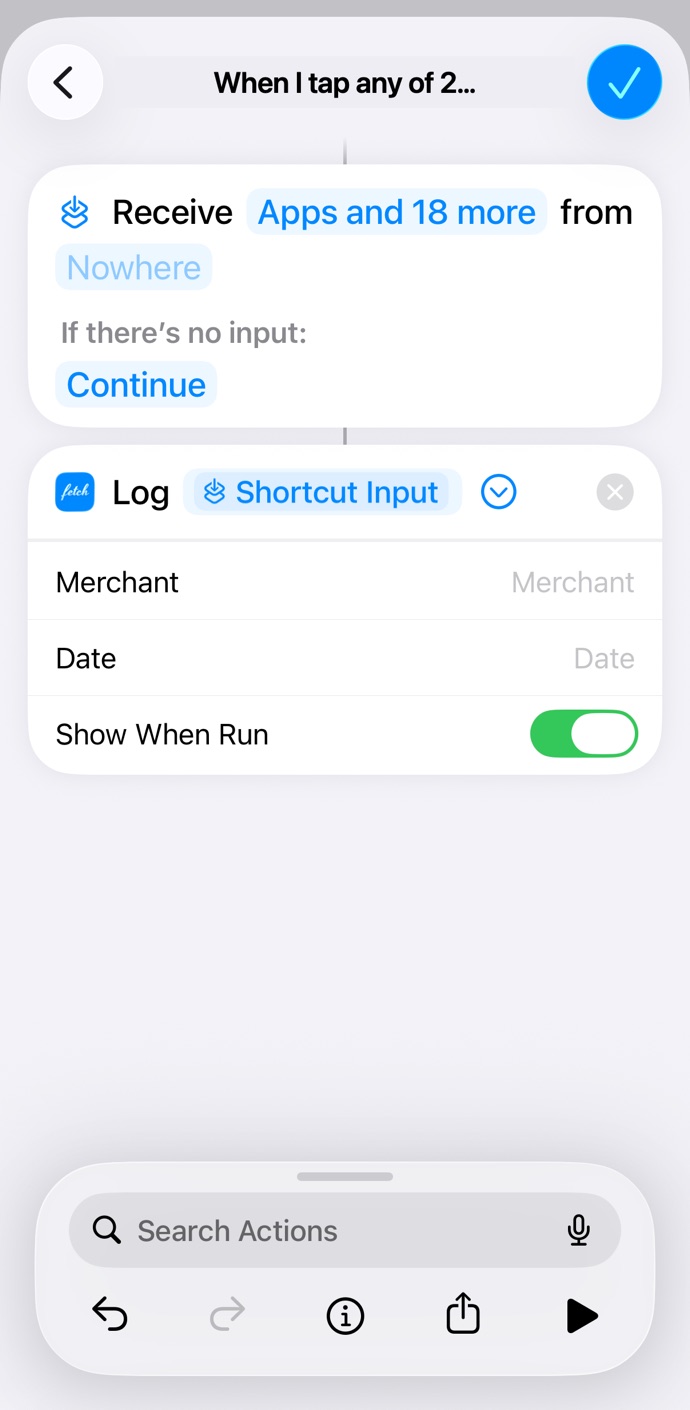
Step 9. Tap the arrow next to the amount to show the other fields, then tap Merchant. -
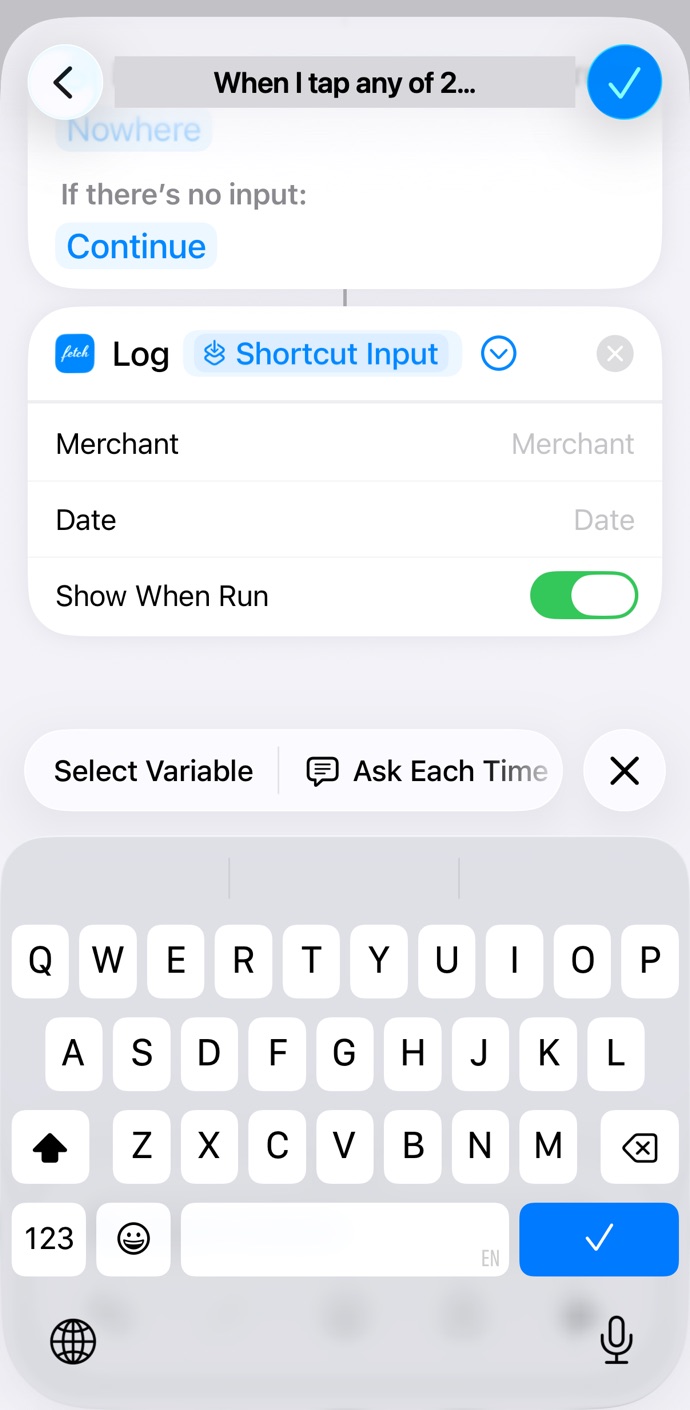
Step 10. Tap Select Variable above the keyboard, then Shortcut Input above the action — the same as for the amount. -
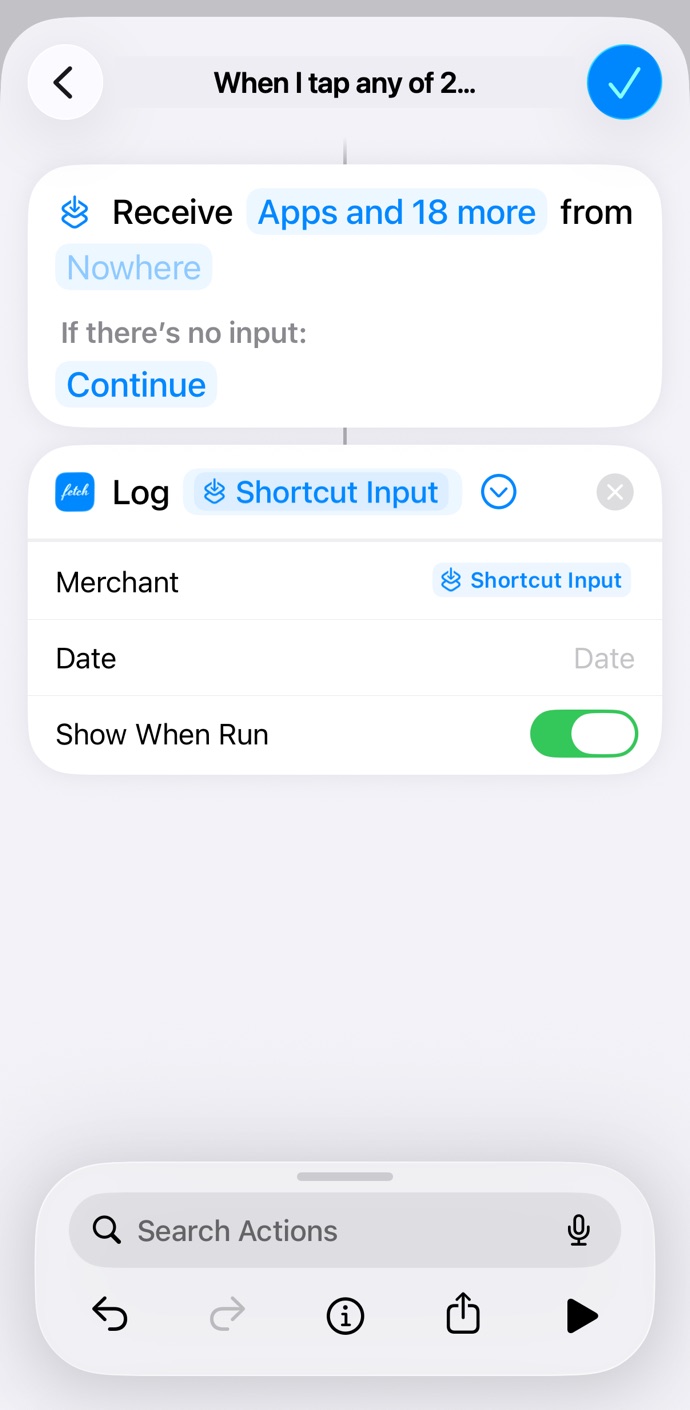
Step 11. Tap the Shortcut Input token in Merchant and choose Merchant. Leave Date empty — the time of the tap is used. -
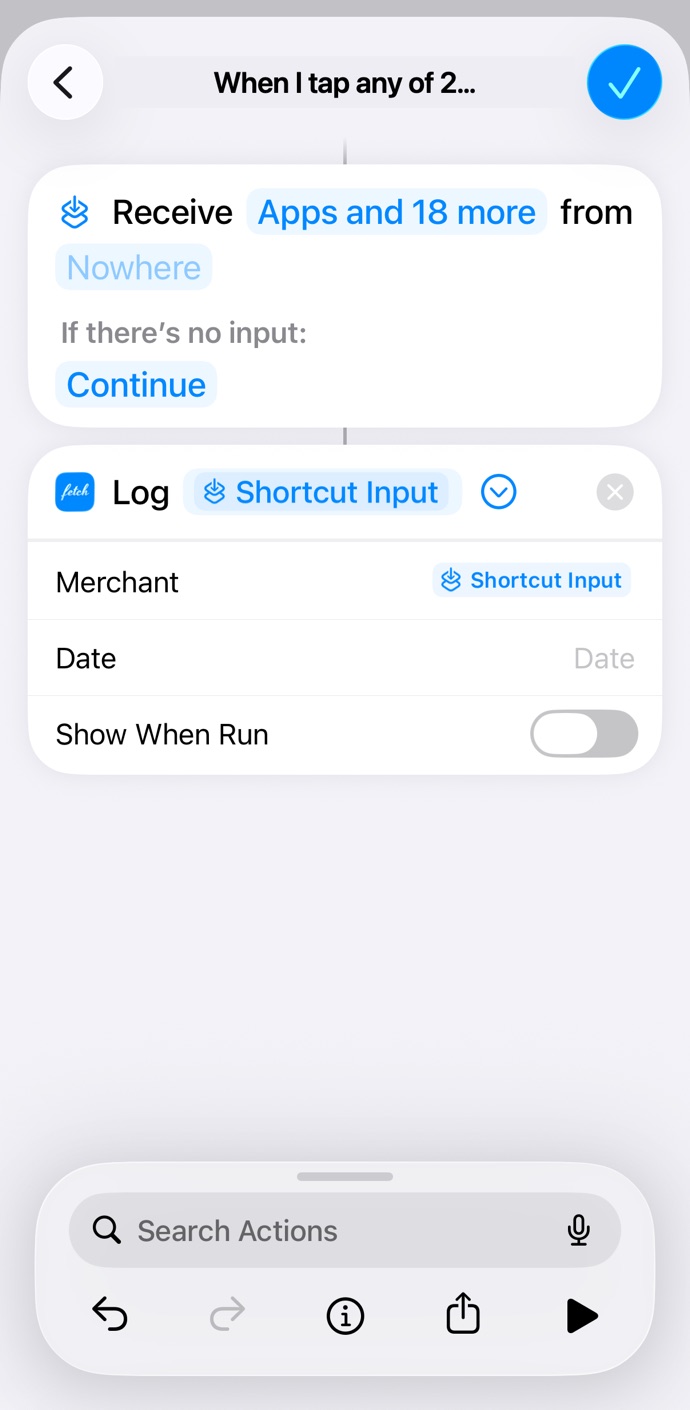
Step 12. Turn off Show When Run and tap Done.
That's it: your next Apple Pay tap logs itself.
Check that it works
Make a small Apple Pay payment with one of the ticked cards. Then open Fetch: the expense should be in your transactions with the payment's amount and merchant, the source Apple Pay and a category assigned. If it isn't there, check in this order:
- The automation is turned on. On iOS 27, shortcuts that arrive from a link come with Automation off: open it and switch it on.
- The card you paid with is ticked in the Wallet trigger.
- Run Immediately is selected. Otherwise iOS asks for confirmation at the till and the expense waits for your answer.
- Amount and Merchant point to Shortcut Input, not to a number or text typed by hand.
- You opened Fetch signed in after installing or updating. Signed out, the action warns and doesn't save.
Privacy: what leaves your phone
The automation runs on your iPhone. What Fetch receives from each payment is amount, merchant and date, the same as you'd type by hand, and it stores it like any other transaction of yours. No bank access, no credentials handed over, no aggregator in the middle. If you'd rather a card isn't logged, leave it unticked in the trigger, or delete the expense in Fetch.
Where Fetch comes in
Transparency: this guide is by Fetch, our AI personal finance app, and describes a feature of the app. Apple Pay is one more way in, next to voice, receipt photos and statement uploads: everything lands in the same budget, with no bank login at any point.
Frequently asked questions
Does Fetch connect to my bank to read Apple Pay purchases?
No. Fetch does not access Wallet or your bank. It is a Shortcuts automation you set up once: when you pay with a Wallet card, iOS runs Fetch's “Log expense” action with the amount, merchant and date. Everything happens on your phone.
What data does Fetch receive from each payment?
Three things: amount, merchant and date. The action has no field for the card number. Fetch assigns the category from the merchant name, and you can change it.
Does it work on Android?
No: Apple Pay and Shortcuts exist only on iPhone. On Android, Fetch logs expenses by voice, from a receipt photo or from an uploaded statement.
Do I have to keep Fetch open?
No. iOS runs the automation even when Fetch is closed. You only need to have opened Fetch once after installing or updating, signed in.
I paid and nothing showed up. What do I check?
That the automation is on, that the card is ticked in the trigger, that Run Immediately is selected, that Amount and Merchant point to Shortcut Input, and that you opened Fetch signed in after the last update.
Apple Pay, Wallet, Shortcuts and iPhone are trademarks of Apple Inc. Fetch is not affiliated with or endorsed by Apple. Shortcuts element names are those of iOS in English and may vary between versions.
Set it up once. After that, every payment logs itself.
Download Fetch, sign in and open the Apple Pay guide inside the app: the same steps, with the shortcut link one tap away.